前回はMySQL、前々回はPHPのアップデートを行ってきて今回は残りのウェブサーバーのアップデートを実施しました。当初httpd2.2から2.4へのアップデートを検討していたのですがCentOS6だと依存関係の解決やyumでインストールするためのリポジトリの周りが大変なことが分かったのでnginxに切り替える方針に変更してみました。
途中からウェブサーバーと関係ないこともやってましたも。
httpd2.2のアンインストール
実際の手順はhttpd2.4を入れようとして失敗したり間違えてHTTP/2.0に対応していないnginxをインストールしてしまったりで、ヒストリー見てもよくわからない状態になっています。覚えてるところだけまとめました(^^;

# yum remove httpd httpd-tools

既存のhttpdを確認して削除するだけです。
PHP7.3が依存関係の解決によりまとめて消えてしまいますので後で入れなおしています。以下のようなコマンドで依存関係を無視した削除も行えると思います。
# rpm -e --nodeps httpd
# rpm -e --nodeps httpd-tools
nginx1.16.0のインストール
サーバー内のopensslのバージョンが1.0.1でHTTP/2.0に対応していないためソースからビルドしてインストールしています。
以下のページがすごく参考になりました。
参考:WordPressをFascCGI Cacheで爆速仕様にする際の注意点【Nginxインストール編】 | | リーテラトバリタブログ
参考:nginxビルド時のエラー – Qiita
参考:Red Hat NGINX Init Script | NGINX
参考:yum(パッケージマネージャー)を使わずにNginxをアップデートする方法 | | リーテラトバリタブログ
ソースを取得
# cd /usr/local/src
# wget https://nginx.org/download/nginx-1.16.0.tar.gz
# tar -zxvf nginx-1.16.0.tar.gz
# wget http://labs.frickle.com/files/ngx_cache_purge-2.3.tar.gz
# tar -xvzf ngx_cache_purge-2.3.tar.gz

ビルド用のoepnsslのソースを取得
# wget https://www.openssl.org/source/openssl-1.0.2r.tar.gz
# tar zxvf openssl-1.0.2r.tar.gz

ビルドエラーを回避
# yum install pcre-devel

ビルド
# ./configure --prefix=/etc/nginx --sbin-path=/usr/sbin/nginx --modules-path=/usr/lib64/nginx/modules --conf-path=/etc/nginx/nginx.conf --error-log-path=/var/log/nginx/error.log --http-log-path=/var/log/nginx/access.log --pid-path=/var/run/nginx.pid --lock-path=/var/lock/nginx.lock --http-client-body-temp-path=/var/cache/nginx/client_temp --http-proxy-temp-path=/var/cache/nginx/proxy_temp --http-fastcgi-temp-path=/var/cache/nginx/fastcgi_temp --http-uwsgi-temp-path=/var/cache/nginx/uwsgi_temp --http-scgi-temp-path=/var/cache/nginx/scgi_temp --user=nginx --group=nginx --with-file-aio --with-threads --with-ipv6 --with-http_addition_module --with-http_auth_request_module --with-http_dav_module --with-http_flv_module --with-http_gunzip_module --with-http_gzip_static_module --with-http_mp4_module --with-http_random_index_module --with-http_realip_module --with-http_secure_link_module --with-http_slice_module --with-http_ssl_module --with-http_stub_status_module --with-http_sub_module --with-http_v2_module --with-openssl=../openssl-1.0.2r/ --with-mail --with-mail_ssl_module --with-stream --with-stream_ssl_module --with-cc-opt='-O2 -g -pipe -Wall -Wp,-D_FORTIFY_SOURCE=2 -fexceptions -fstack-protector --param=ssp-buffer-size=4 -m64 -mtune=generic -fPIC' --with-ld-opt='-Wl,-z,relro -Wl,-z,now -pipe' --add-module=/usr/local/src/ngx_cache_purge-2.3
# make && make install
# nginx -v

php-fpmのlistenとnginxのfastcgi_passの設定を合わせる
ユーザーやグループをapache→nginxに設定する
# vi /etc/php-fpm.d/www.conf
起動スクリプトを作成(https://www.nginx.com/resources/wiki/start/topics/examples/redhatnginxinit/)
# vi /etc/init.d/nginx
# chmod a+x /etc/init.d/nginx
# /etc/init.d/nginx start

自動起動設定
# chkconfig nginx on
nginxはオプションの不備などで3回くらいビルドしなおしました(^q^
現在、当ドメイン以下にはWordPressが4つインストールされており以下のような構成になっています。
当サイト https://blog.imo-tikuwa.com/
子サイト1 https://blog.imo-tikuwa.com/ssl-2016/
子サイト2 https://blog.imo-tikuwa.com/md5-36-base-num/
子サイト3 https://blog.imo-tikuwa.com/md5-62-base-num/
httpdの頃はサブドメインなしのimo-tikuwa.comへのアクセスをblogサブドメインに301リダイレクトしていたのでその辺の設定も行ってみました。ちょっとだけややこしくなって以下のようになりました。mod-pagespeedやmod-deflate、mod-expireで設定していたgzip圧縮や画像ファイルのキャッシュ期間の設定もざっくり移しています。
参考:Nginx – WordPress Codex 日本語版
参考:nginx – nginx環境でのサブディレクトリへのワードプレス設置|teratail
server {
    listen 80;
    server_name imo-tikuwa.com;
    return 301 https://blog.imo-tikuwa.com$request_uri;
}

server {
    listen 443 ssl http2;
    ssl_certificate /etc/letsencrypt/live/imo-tikuwa.com/fullchain.pem;
    ssl_certificate_key /etc/letsencrypt/live/imo-tikuwa.com/privkey.pem;
    server_name imo-tikuwa.com;
    return 301 https://blog.imo-tikuwa.com$request_uri;
}

server {
    listen 80;
    server_name blog.imo-tikuwa.com;
    return 301 https://$host$request_uri;
}

server {
    listen 443 ssl http2;
    ssl_certificate /etc/letsencrypt/live/imo-tikuwa.com/fullchain.pem;
    ssl_certificate_key /etc/letsencrypt/live/imo-tikuwa.com/privkey.pem;
    server_name blog.imo-tikuwa.com;
    root /var/www/@@@@@;
    index index.php;

    ssl_session_timeout 1d;
    ssl_session_cache shared:SSL:50m;
    ssl_session_tickets on;
    ssl_ciphers ECDHE+RSAGCM:ECDH+AESGCM:DH+AESGCM:ECDH+AES256:DH+AES256:ECDH+AES128:DH+AES:!EXPORT:!DES:!3DES:!MD5:!DSS;
    ssl_protocols TLSv1 TLSv1.1 TLSv1.2;
    ssl_prefer_server_ciphers on;

    gzip on;
    gzip_types text/css application/javascript application/json application/font-woff application/font-tff image/gif image/png image/jpeg application/octet-stream;

    rewrite ^/sitemap(-+([a-zA-Z0-9_-]+))?\.xml$ "/index.php?xml_sitemap=params=$2" last;
    rewrite ^/sitemap(-+([a-zA-Z0-9_-]+))?\.xml\.gz$ "/index.php?xml_sitemap=params=$2;zip=true" last;
    rewrite ^/sitemap(-+([a-zA-Z0-9_-]+))?\.html$ "/index.php?xml_sitemap=params=$2;html=true" last;
    rewrite ^/sitemap(-+([a-zA-Z0-9_-]+))?\.html.gz$ "/index.php?xml_sitemap=params=$2;html=true;zip=true" last;

    location / {
#        auth_basic "Basic Auth.";
#        auth_basic_user_file /etc/nginx/.htpasswd;

        try_files $uri $uri/ /index.php?$args;
    }
    location ~ \.php$ {
        try_files $uri =404;
        fastcgi_split_path_info ^(.+\.php)(/.+)$;
        fastcgi_pass unix:/var/run/php-fpm/php-fpm.sock;
        fastcgi_index index.php;
        fastcgi_param SCRIPT_FILENAME $document_root$fastcgi_script_name;
        include fastcgi_params;
    }


    # 子サイトの設定 ここから
    if (!-e $request_filename) {
        rewrite ^/md5-36-base-num(.+)$ /md5-36-base-num/index.php?q=$1 last;
        rewrite ^/md5-62-base-num(.+)$ /md5-62-base-num/index.php?q=$1 last;
        rewrite ^/ssl-2016(.+)$ /ssl-2016/index.php?q=$1 last;
        break;
    }

    # MD5Decrypter36
    location ~^/md5-36-base-num/(.+\.php)$ {
        alias /var/www/@@@@@/md5-36-base-num/$1;
        fastcgi_pass  unix:/var/run/php-fpm/php-fpm.sock;
        fastcgi_index index.php;
        fastcgi_param SCRIPT_FILENAME $document_root$fastcgi_script_name;
        include fastcgi_params;
    }

    # MD5Decrypter62
    location ~^/md5-62-base-num/(.+\.php)$ {
        alias /var/www/@@@@@/md5-62-base-num/$1;
        fastcgi_pass  unix:/var/run/php-fpm/php-fpm.sock;
        fastcgi_index index.php;
        fastcgi_param SCRIPT_FILENAME $document_root$fastcgi_script_name;
        include fastcgi_params;
    }

    # SSLに対応したWebサイト/Webシステム構築の手引き
    location ~^/ssl-2016/(.+\.php)$ {
        alias /var/www/@@@@@/ssl-2016/$1;
        fastcgi_pass  unix:/var/run/php-fpm/php-fpm.sock;
        fastcgi_index index.php;
        fastcgi_param SCRIPT_FILENAME $document_root$fastcgi_script_name;
        include fastcgi_params;
    }


    # http://wpdocs.osdn.jp/Nginx
    include /etc/nginx/wp/restrictions.conf;
    include /etc/nginx/wp/wordpress.conf;
}
以下はwordpress.confになります。
# http://wpdocs.osdn.jp/Nginx#.E9.80.9A.E5.B8.B8.E3.81.AEWordPress.E3.81.AE.E3.83.AB.E3.83.BC.E3.83.AB
# WordPress シングルブログルール。
# どの server {} ブロックからもインクルードできるよう設計されています。

# */wp-admin へのリクエスト末尾にスラッシュを追加します。
rewrite /wp-admin$ $scheme://$host$uri/ permanent;

# Expiresヘッダを送り、404エラーログをオフにするディレクティブ。
location ~* \.(js|css|png|jpg|jpeg|gif|ico)$ {
        expires 7d;
        add_header Cache-Control "public, no-transform";
        log_not_found off;
}

# 必要なら、キャッシュプラグインのためにいずれかの行のコメントを外してください。
#include global/wordpress-wp-super-cache.conf;
#include global/wordpress-w3-total-cache.conf;

# すべてのPHPファイルを php-fpm/php-fcgi サーバーに送ります。
location ~ \.php$ {
        # ゼロデイ攻撃を防ぐ
        # http://forum.nginx.org/read.php?2,88845,page=3
        # このサーバーにファイルが存在しなくい場合、404エラーになって動作しないようにします。
        # 別のマシーンに php-fpm/php-fcgi を設定する場合は 'try_files' のラインをコメントアウトしてください。自分のマシーンがハックされないようお祈りしましょう。
        try_files $uri =404;

        fastcgi_split_path_info ^(.+\.php)(/.+)$;
        include fastcgi_params;
        fastcgi_index index.php;
        fastcgi_param SCRIPT_FILENAME $document_root$fastcgi_script_name;
#       fastcgi_intercept_errors on;
        fastcgi_pass unix:/var/run/php-fpm/php-fpm.sock;
}
HTTP/2.0の動作確認

nginxを起動後適当なページを確認しプロトコルの表示がHTTP/1.1からHTTP/2.0に変わっていることを確認しました。
httpd2.2の頃の表示は撮り忘れてました。。(;;
キャッシュプラグインの導入と動作確認
WP SiteManagerというプラグインをインストールしてみました。
インストール&有効化後wp-config.phpに以下を追記するだけで動きました。
define('WP_CACHE', true);その他、サイドメニューのWP SiteManager>モジュールからON/OFFできるTheme Switcherという機能はOFFにしておきました。また、キャッシュの設定画面から「記事公開時に削除するキャッシュの範囲」で「記事とトップページ」を選択しておきました。
プラグインのキャッシュを参照する仕組みはログイン中は効かないので自分で動作確認する際はいったんログアウトする必要がありました。
以下は子サイトのとあるページを参照したときのプラグイン導入前後の結果です。
 ↓
↓
プラグインの導入前に2938msだったのが38msで返ってきてました。約80倍の性能改善です。
動的な結果を返さないブログコンテンツで特に有効なプラグインと言えるかと思います。これもっと早く導入しとけばよかった。
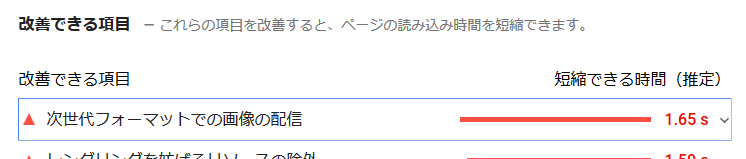
webp画像配信の設定
PageSpeed Insightsで改善点を探していたところ「次世代フォーマットでの画像の配信」による短縮可能な時間の推定が結構大きかったので、EWWW Image Optimizerというプラグインをインストールしてみました。webpといったらこれみたいなプラグインのようでした。
参考:「Dev.to」で話題の爆速画像フォーマット「WebP」をWordPressサイトにお手軽導入する – Webを楽しもう「ドークツ」
参考:WordPress でプラグインを併用して WebP を活用する | ぶっちろぐ
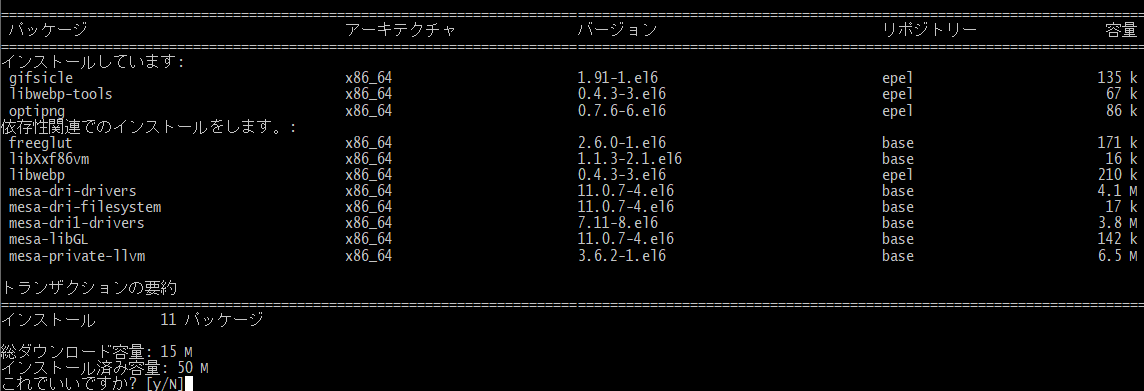
導入するにあたって以下をインストールしました。
# yum install libjpeg optipng gifsicle libwebp-tools
プラグイン導入以前の既存画像のついてはサイドメニューのメディア>一括最適化から一括作成することができました。
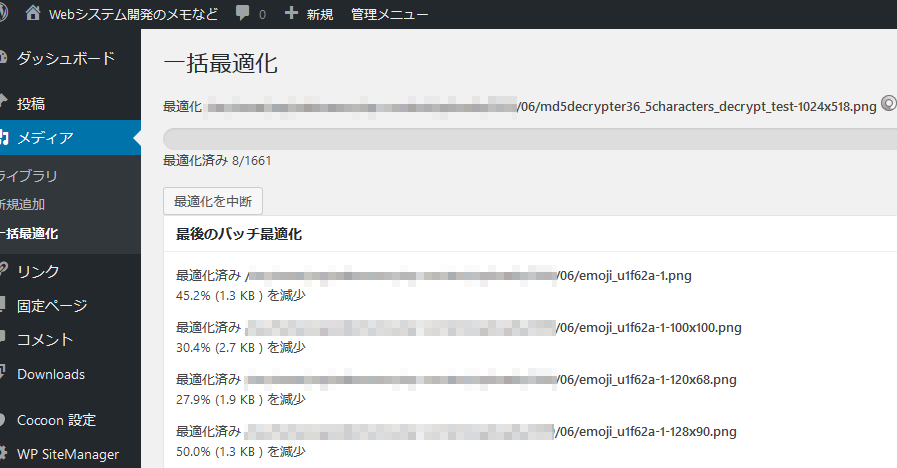
一括最適化には30分くらい掛かりました。サーバーの性能によると思います。
使用しているウェブサーバーがhttpdの場合はプラグインの管理画面に表示される設定を.htaccessに貼ることでwebpが参照されるようになりますが、今回はnginxに置き換えているので以下のサイトを参考に設定を行いました。
参考:EWWW IO and WebP Images – EWWW I.O. Documentation

動作確認です。画像のタイプがwebpとなっていることがわかります。
job_hikkoshi_taihen-318×180.pngをローカルに落としたものと比較してもwebp画像が参照されていることが確認できました。
SSL LabsによるSSLの設定状況の診断
参考:Qualys SSL Labs の SSL脆弱性診断(SSL Server Test)について | 株式会社セブンネット
 ↓
↓
評価がCからAになりました。
httpd2.2の頃はSSL3を有効化してしまっていたみたいで赤いアラートが上がってました(^q^
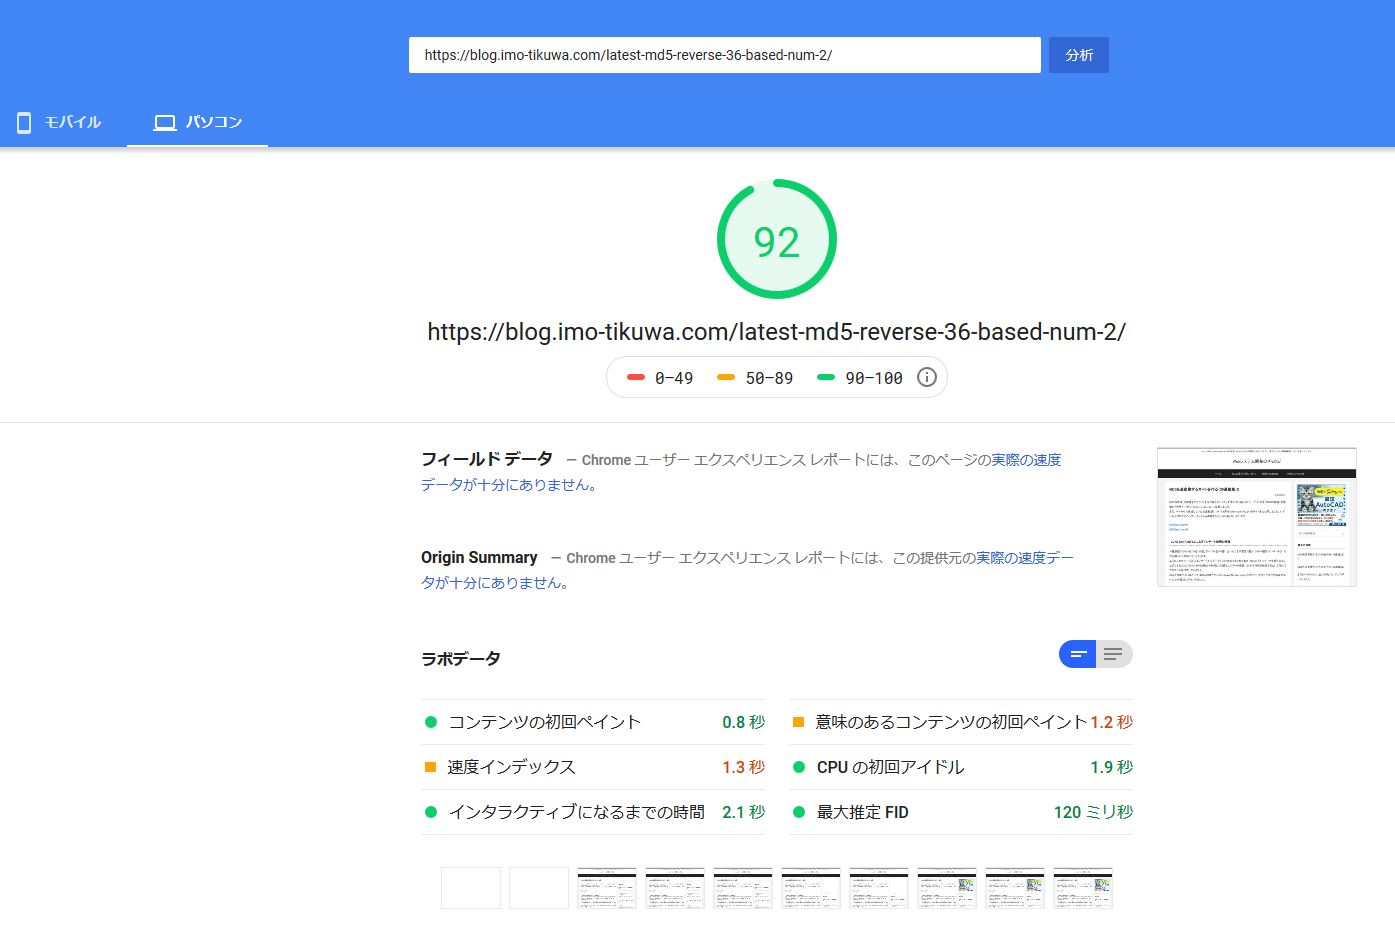
アップデート前後のPageSpeed Insightsのスコア
PC版アップデート前

PC版アップデート後
SP版アップデート前
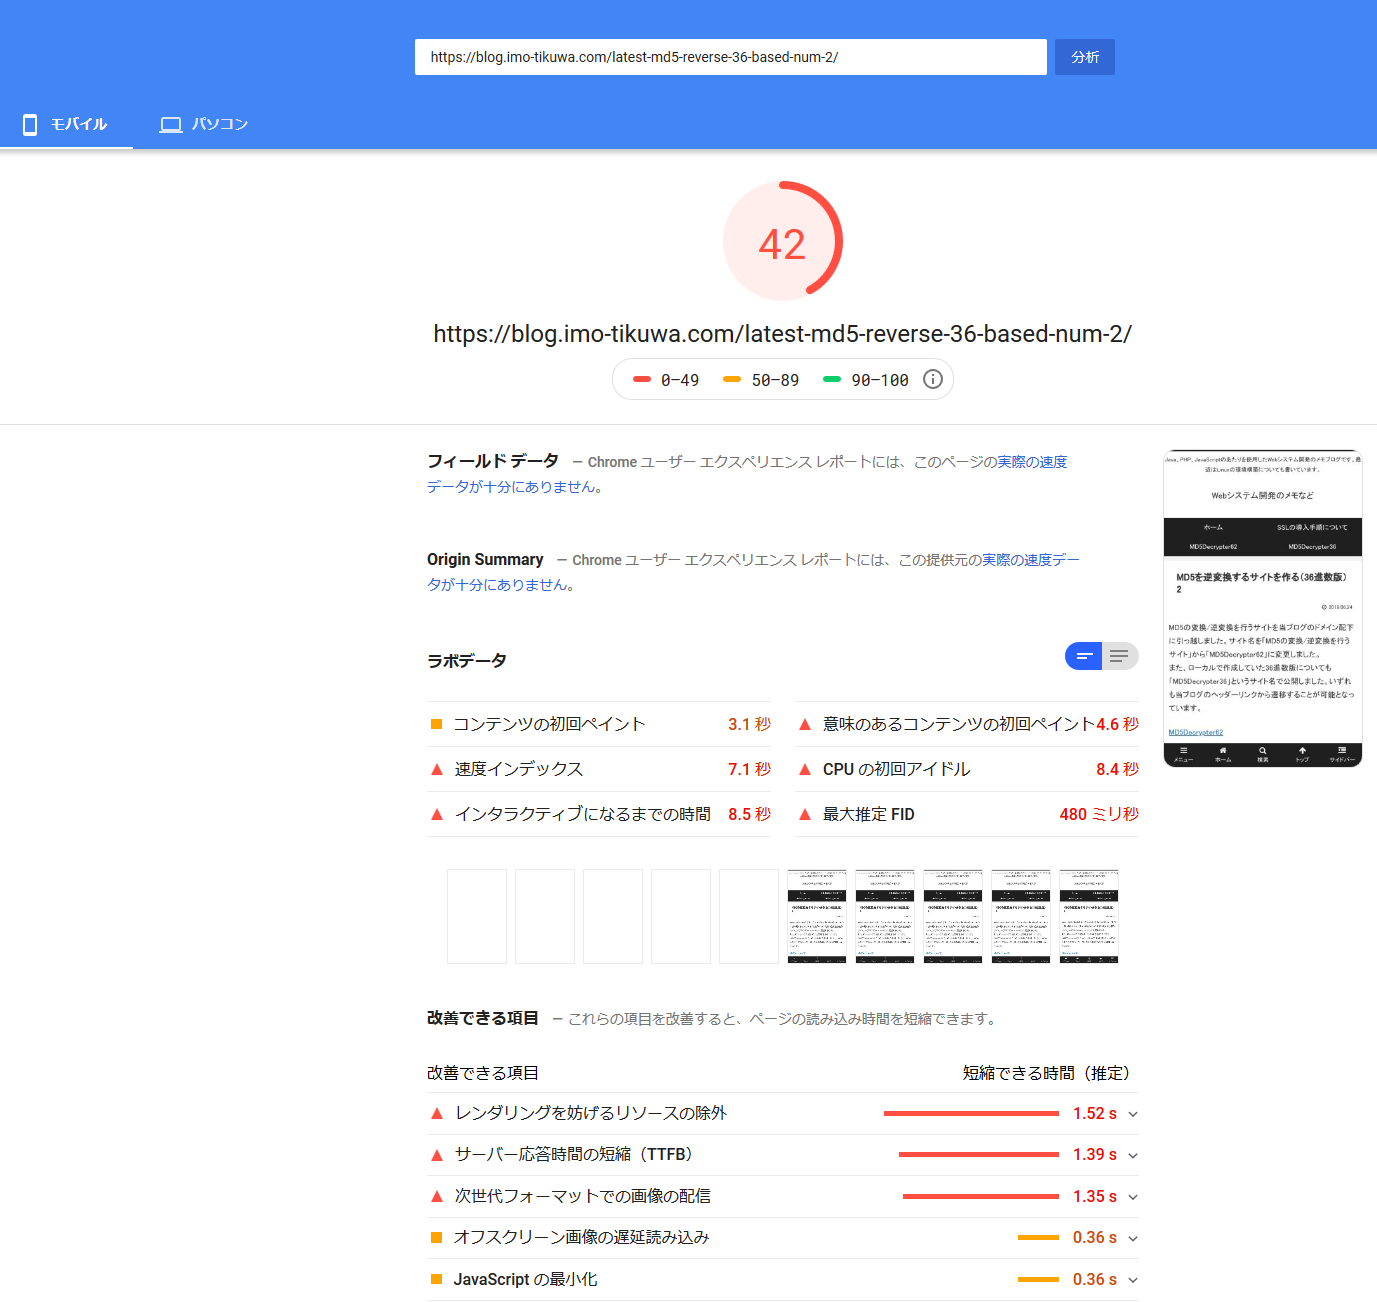
SP版アップデート後

今回はPC/SPともにスコアが改善されました。SP版に関しては次世代フォーマットのアラートが出なくなりました。
どの変更に効果があったかまで細かく調べてはいませんが、何度か同じページを計測しているうちにスコアが改善されたのでキャッシュプラグインの効果はあったと言えそう。
SSL証明書の再発行バッチの修正
httpdからnginxに切り替えたのでLet’s Encryptの証明書再発行のバッチも以下のように書き換えました。動作自体は特に問題なく再発行できてました。
-# httpdを停止
-/etc/init.d/httpd stop
+# nginxを停止
+/etc/init.d/nginx stop

# 証明書を更新
/usr/local/src/letsencrypt/letsencrypt-auto renew --force-renew

-# httpdを開始
-#/etc/init.d/httpd start
+# nginxを開始
+/etc/init.d/nginx start