以下に紹介する手順はああでもないこうでもないと追記していった都合上、順番がごちゃごちゃしてると思います。
移行の理由について
- 作成中のツールがCentOS6環境だと環境構築しづらそう
- PHP8、MySQL8が必要
- CentOS6はEOL切れてる
- CentOS Stream使ってみたい
- ストレージはSSDが良い
- 価格もできるだけ安いところが良い
さくらのVPSは新卒で就職した会社の仕事内容についていくのに勉強用として契約したサーバーだったと思うので約8年くらい使ったことになると思います。
記憶が正しければ一度も停止することなく安定したサーバーだったと思います。
最初はApache+Java+Tomcatの環境でSeasar2とか動かしてましたが、ここ数年はPHP7の他、PythonやRubyのプログラムを動かしたりしてて非常にごちゃごちゃしてました。。
一応、さくらのVPSやAWS Lightsailなんかも移行先の候補ではあったのですが、最終的には一番安価と思われるConoHaになりました(^^)
移行元(さくらのVPS、CentOS6)環境情報
OS情報
# cat /etc/redhat-release
CentOS release 6.10 (Final)
Node.js、npm、composer、rbenv、ruby、mysql等
# nvm --version
0.35.2
# which node
/root/.nvm/versions/node/v10.16.0/bin/node
# node -v
v10.16.0
# which npm
/root/.nvm/versions/node/v10.16.0/bin/npm
# npm -v
6.9.0

# composer --version
Do not run Composer as root/super user! See https://getcomposer.org/root for details
Composer version 1.9.2 2020-01-14 16:30:31
# which composer
/usr/local/bin/composer

# which rbenv
/root/.rbenv/bin/rbenv
# rbenv versions
* 2.6.0 (set by /root/.rbenv/version)
  2.6.5
# ruby --version
ruby 2.6.0p0 (2018-12-25 revision 66547) [x86_64-linux]
# which ruby
/root/.rbenv/shims/ruby

# mysql --version
mysql Ver 14.14 Distrib 5.7.35, for Linux (x86_64) using EditLine wrapper
MySQLは5.7から8.0にアップグレードすることを考えてるので既存の設定はあまり見ないで移行する予定
続いてインストールされているPHPパッケージは以下の通り
# yum list installed | grep php
oniguruma5php.x86_64               6.9.6-1.el6.remi           @remi-safe
php.x86_64                         7.3.25-1.el6.remi          @remi-php73
php-cli.x86_64                     7.3.25-1.el6.remi          @remi-php73
php-common.x86_64                  7.3.25-1.el6.remi          @remi-php73
php-devel.x86_64                   7.3.25-1.el6.remi          @remi-php73
php-fedora-autoloader.noarch       1.0.1-2.el6                @epel
php-fpm.x86_64                     7.3.25-1.el6.remi          @remi-php73
php-gd.x86_64                      7.3.25-1.el6.remi          @remi-php73
php-intl.x86_64                    7.3.25-1.el6.remi          @remi-php73
php-json.x86_64                    7.3.25-1.el6.remi          @remi-php73
php-mbstring.x86_64                7.3.25-1.el6.remi          @remi-php73
php-mysqlnd.x86_64                 7.3.25-1.el6.remi          @remi-php73
php-pdo.x86_64                     7.3.25-1.el6.remi          @remi-php73
php-pear.noarch                    1:1.10.12-4.el6.remi       @remi-php73
php-pecl-mcrypt.x86_64             1.0.3-1.el6.remi.7.3       @remi-php73
php-pecl-zip.x86_64                1.19.2-1.el6.remi.7.3      @remi-php73
php-process.x86_64                 7.3.25-1.el6.remi          @remi-php73
php-xml.x86_64                     7.3.25-1.el6.remi          @remi-php73
php.iniは最古の設定ファイルと比較したらわけわかんないくらい差分出てきたので割と最近のと比較してます。
足りないものは使ってるうちに気づくと思うのでざっくりと調査
# diff /etc/php.ini /etc/php.ini.bak20190613
376c376
< expose_php = Off
---
> expose_php = On
693c693
< post_max_size = 16M
---
> post_max_size = 8M
845c845
< upload_max_filesize = 14M
---
> upload_max_filesize = 2M
移行先(ConoHa、CentOS Stream)環境情報、初期設定
OS情報
# cat /etc/redhat-release
CentOS Stream release 8
日本語化、設定反映を確認
# dnf install langpacks-ja
# localectl set-locale LANG=ja_JP.UTF-8
# localectl
   System Locale: LANG=ja_JP.UTF-8
       VC Keymap: jp
      X11 Layout: jp

# date
Sat Oct 23 21:18:18 JST 2021
# source /etc/locale.conf
# date
2021年 10月 23日 土曜日 21:18:30 JST
wkhtmltopdf&フォントインストール
いくつかのフォントは移行元のサーバーから取得(ネット上で見つからなかった)
# cd /usr/local/bin
# wget https://github.com/wkhtmltopdf/packaging/releases/download/0.12.6-1/wkhtmltox-0.12.6-1.centos8.x86_64.rpm
# yum install wkhtmltox-0.12.6-1.centos8.x86_64.rpm
# wkhtmltopdf --version
wkhtmltopdf 0.12.6 (with patched qt)

# cd
# unzip IPAexfont00401.zip
# mv IPAexfont00401 /usr/share/fonts/
# unzip sakura-vps-fonts.zip
# mv sakura-vps-fonts /usr/share/fonts/
# fc-cache -fv
# fc-list | grep IPA
/usr/share/fonts/sakura-vps-fonts/fonts/ipa-pmincho/ipamp.ttf: IPA P明朝,IPAPMincho:style=Regular
/usr/share/fonts/IPAexfont00401/ipaexg.ttf: IPAexゴシック,IPAexGothic:style=Regular
/usr/share/fonts/sakura-vps-fonts/fonts/ipa-pgothic/ipagp.ttf: IPA Pゴシック,IPAPGothic:style=Regular
/usr/share/fonts/sakura-vps-fonts/fonts/ipa-gothic/ipag.ttf: IPAゴシック,IPAGothic:style=Regular
/usr/share/fonts/IPAexfont00401/ipaexm.ttf: IPAex明朝,IPAexMincho:style=Regular
/usr/share/fonts/sakura-vps-fonts/fonts/ipa-mincho/ipam.ttf: IPA明朝,IPAMincho:style=Regular
composerインストール
# cd /usr/local/bin
# wget https://getcomposer.org/installer -O composer-installer.php
# php composer-installer.php --filename=composer --install-dir=/usr/local/bin
# rm composer-installer.php
# composer --version
Composer version 2.1.9 2021-10-05 09:47:38
nginxインストール
CentOS Stream標準のnginxバージョンが1.14.1なのを確認
# yum list available | grep nginx
collectd-nginx.x86_64                            5.9.0-5.el8                                 epel
collectd-nginx-debuginfo.x86_64                  5.9.0-5.el8                                 epel-debuginfo
munin-nginx.noarch                               2.0.66-1.el8                                epel
nginx.x86_64                                     1:1.14.1-9.module_el8.0.0+184+e34fea82      appstream
nginx-all-modules.noarch                         1:1.14.1-9.module_el8.0.0+184+e34fea82      appstream
nginx-filesystem.noarch                          1:1.14.1-9.module_el8.0.0+184+e34fea82      appstream
nginx-mod-http-image-filter.x86_64               1:1.14.1-9.module_el8.0.0+184+e34fea82      appstream
nginx-mod-http-perl.x86_64                       1:1.14.1-9.module_el8.0.0+184+e34fea82      appstream
nginx-mod-http-xslt-filter.x86_64                1:1.14.1-9.module_el8.0.0+184+e34fea82      appstream
nginx-mod-mail.x86_64                            1:1.14.1-9.module_el8.0.0+184+e34fea82      appstream
nginx-mod-stream.x86_64                          1:1.14.1-9.module_el8.0.0+184+e34fea82      appstream
nginx公式のリポジトリを追加
# vi /etc/yum.repos.d/nginx.repo
[nginx-stable]
name=nginx stable repo
baseurl=http://nginx.org/packages/centos/$releasever/$basearch/
gpgcheck=1
enabled=1
gpgkey=https://nginx.org/keys/nginx_signing.key
module_hotfixes=true

[nginx-mainline]
name=nginx mainline repo
baseurl=http://nginx.org/packages/mainline/centos/$releasever/$basearch/
gpgcheck=1
enabled=0
gpgkey=https://nginx.org/keys/nginx_signing.key
module_hotfixes=true
リポジトリ追加後、最新の1.20がインストールできることを確認
# yum list available | grep nginx
collectd-nginx.x86_64                            5.9.0-5.el8                                 epel
collectd-nginx-debuginfo.x86_64                  5.9.0-5.el8                                 epel-debuginfo
munin-nginx.noarch                               2.0.66-1.el8                                epel
nginx.x86_64                                     1:1.20.1-1.el8.ngx                          nginx-stable
nginx-all-modules.noarch                         1:1.14.1-9.module_el8.0.0+184+e34fea82      appstream
nginx-debuginfo.x86_64                           1:1.20.1-1.el8.ngx                          nginx-stable
nginx-filesystem.noarch                          1:1.14.1-9.module_el8.0.0+184+e34fea82      appstream
nginx-mod-http-image-filter.x86_64               1:1.14.1-9.module_el8.0.0+184+e34fea82      appstream
nginx-mod-http-perl.x86_64                       1:1.14.1-9.module_el8.0.0+184+e34fea82      appstream
nginx-mod-http-xslt-filter.x86_64                1:1.14.1-9.module_el8.0.0+184+e34fea82      appstream
nginx-mod-mail.x86_64                            1:1.14.1-9.module_el8.0.0+184+e34fea82      appstream
nginx-mod-stream.x86_64                          1:1.14.1-9.module_el8.0.0+184+e34fea82      appstream
nginx-module-image-filter.x86_64                 1:1.20.1-1.el8.ngx                          nginx-stable
nginx-module-image-filter-debuginfo.x86_64       1:1.20.1-1.el8.ngx                          nginx-stable
nginx-module-njs.x86_64                          1:1.20.1+0.7.0-1.el8.ngx                    nginx-stable
nginx-module-njs-debuginfo.x86_64                1:1.20.1+0.7.0-1.el8.ngx                    nginx-stable
nginx-module-perl.x86_64                         1:1.20.1-1.el8.ngx                          nginx-stable
nginx-module-perl-debuginfo.x86_64               1:1.20.1-1.el8.ngx                          nginx-stable
nginx-module-xslt.x86_64                         1:1.20.1-1.el8.ngx                          nginx-stable
nginx-module-xslt-debuginfo.x86_64               1:1.20.1-1.el8.ngx                          nginx-stable
pagure-web-nginx.noarch                          5.13.2-1.el8                                epel
pcp-pmda-nginx.x86_64                            5.3.4-1.el8                                 appstream
python-certbot-nginx.src                         1.20.0-1.el8                                epel-source
python3-certbot-nginx.noarch                     1.20.0-1.el8                                epel
以下のコマンドでインストール&自動起動の設定&起動
# yum install nginx
# nginx -v
nginx version: nginx/1.20.1

# systemctl enable nginx
# systemctl start nginx
ファイアウォール設定
# firewall-cmd --add-service=http --permanent
# firewall-cmd --add-service=https --permanent
# firewall-cmd --reload
設定後、http://[グローバルIP]/にアクセスしnginxのWelcome画面が見れることを確認しました。
10/27 19:00追記 表示が遅い件を解決(nginxをソースからインストール)
移行元の環境に比べて記事を表示するのに大きく時間が掛かってしまっていることを確認。
調べたところ以前の環境ではnginxにngx_cache_purgeというモジュールを追加したものを使用していました。
→当時の記事1(2019年6月)、記事2(2019年12月)
なお、移行元ではnginxのソースビルドの他に、Wordpress本体にキャッシュプラグインを追加しており、キャッシュされていないページは1秒程度、キャッシュされているページは0.1秒くらいで表示できていました。
今回は過去の記事の内容に加えてOPcache、APCuをインストールしてみました。

↑性能改善前の遅い状態のキャプチャ。表示に9.34秒も掛かってしまっています。
まずはじめにOPcache、APCuをインストール。
設定はいくつかのブログ記事を参考に設定しました。
# dnf install php-opcache
# dnf install php-pecl-apcu

# cp /etc/php.d/10-opcache.ini /etc/php.d/10-opcache.ini.20211027
# vi /etc/php.d/10-opcache.ini
# diff /etc/php.d/10-opcache.ini /etc/php.d/10-opcache.ini.20211027
11c11
< opcache.memory_consumption=128
---
> ;opcache.memory_consumption=128
18c18
< opcache.max_accelerated_files=4000
---
> ;opcache.max_accelerated_files=10000

# cp /etc/php.d/40-apcu.ini /etc/php.d/40-apcu.ini.20211027
# vu /etc/php.d/40-apcu.ini
# diff /etc/php.d/40-apcu.ini /etc/php.d/40-apcu.ini.20211027
20d19
< apc.shm_size=128M
25d23
< apc.ttl=86400
30d27
< apc.gc_ttl=86400

# systemctl restart php-fpm

↑OPcache、APCuインストール後の状態。9.34秒→1秒程度に改善しました。
次にnginxのインストールし直し。
稼働中のnginxは削除したうえで作業しました。
手順は過去の記事のものをベースにopensslのバージョンのみ差し替えたものを使用しました。
# cd /usr/local/src
# wget https://nginx.org/download/nginx-1.21.3.tar.gz
# tar -zxvf nginx-1.21.3.tar.gz
# wget http://labs.frickle.com/files/ngx_cache_purge-2.3.tar.gz
# tar -xvzf ngx_cache_purge-2.3.tar.gz
# wget https://www.openssl.org/source/openssl-1.1.1l.tar.gz
# tar zxvf openssl-1.1.1l.tar.gz

# dnf install pcre-devel
=====================================================================================================================
 パッケージ                   アーキテクチャー         バージョン                     リポジトリー             サイズ
=====================================================================================================================
インストール:
 pcre-devel                   x86_64                   8.42-6.el8                     baseos                   551 k
依存関係のインストール:
 pcre-cpp                     x86_64                   8.42-6.el8                     baseos                    47 k
 pcre-utf16                   x86_64                   8.42-6.el8                     baseos                   195 k
 pcre-utf32                   x86_64                   8.42-6.el8                     baseos                   186 k

# systemctl stop nginx
# dnf list installed | grep nginx
nginx.x86_64                         1:1.20.1-1.el8.ngx                      @nginx-stable
nginx-filesystem.noarch              1:1.14.1-9.module_el8.0.0+184+e34fea82  @appstream
# dnf remove nginx nginx-filesystem

# cd nginx-1.21.3/
# ./configure --prefix=/etc/nginx --sbin-path=/usr/sbin/nginx --modules-path=/usr/lib64/nginx/modules --conf-path=/etc/nginx/nginx.conf --error-log-path=/var/log/nginx/error.log --http-log-path=/var/log/nginx/access.log --pid-path=/var/run/nginx.pid --lock-path=/var/lock/nginx.lock --http-client-body-temp-path=/var/cache/nginx/client_temp --http-proxy-temp-path=/var/cache/nginx/proxy_temp --http-fastcgi-temp-path=/var/cache/nginx/fastcgi_temp --http-uwsgi-temp-path=/var/cache/nginx/uwsgi_temp --http-scgi-temp-path=/var/cache/nginx/scgi_temp --user=nginx --group=nginx --with-file-aio --with-threads --with-http_addition_module --with-http_auth_request_module --with-http_dav_module --with-http_flv_module --with-http_gunzip_module --with-http_gzip_static_module --with-http_mp4_module --with-http_random_index_module --with-http_realip_module --with-http_secure_link_module --with-http_slice_module --with-http_ssl_module --with-http_stub_status_module --with-http_sub_module --with-http_v2_module --with-openssl=../openssl-1.1.1l/ --with-mail --with-mail_ssl_module --with-stream --with-stream_ssl_module --with-cc-opt='-O2 -g -pipe -Wall -Wp,-D_FORTIFY_SOURCE=2 -fexceptions -fstack-protector --param=ssp-buffer-size=4 -m64 -mtune=generic -fPIC' --with-ld-opt='-Wl,-z,relro -Wl,-z,now -pipe' --add-module=/usr/local/src/ngx_cache_purge-2.3
# make && make install

# nginx -v
nginx version: nginx/1.21.3
dnf removeの際にリネームされたnginxの設定ファイルで復元&シンタックスチェック
# cd /etc/nginx
# mv nginx.conf.rpmsave nginx.conf

# nginx -t
nginx: the configuration file /etc/nginx/nginx.conf syntax is ok
nginx: configuration file /etc/nginx/nginx.conf test is successful
起動スクリプト作成
参考:NGINX systemd service file | NGINX
[Unit]
Description=The NGINX HTTP and reverse proxy server
After=syslog.target network-online.target remote-fs.target nss-lookup.target
Wants=network-online.target

[Service]
Type=forking
PIDFile=/run/nginx.pid
ExecStartPre=/usr/sbin/nginx -t
ExecStart=/usr/sbin/nginx
ExecReload=/usr/sbin/nginx -s reload
ExecStop=/bin/kill -s QUIT $MAINPID
PrivateTmp=true

[Install]
WantedBy=multi-user.target
nginxの自動起動設定&起動
# systemctl enable nginx
# systemctl start nginx

↑nginx(+ngx_cache_purge)インストール後のキャプチャ。OPcache、APCuをインストールしたときとあまり変わらず。。
ここまでやってきても依然として移行元の速度と大きく違う状態でなぜなのかを調べたところ、WordPressのキャッシュプラグインを有効化する定数がなくなっているのを確認。。
/**
 * 開発者へ: WordPress デバッグモード
 *
 * この値を true にすると、開発中に注意 (notice) を表示します。
 * テーマおよびプラグインの開発者には、その開発環境においてこの WP_DEBUG を使用することを強く推奨します。
 */
define('WP_DEBUG', false);

/** WP SiteManager用 */
+define('WP_CACHE', true);

/* 編集が必要なのはここまでです ! WordPress でブログをお楽しみください。 */
WP_CACHE定数の設定が消えていたので追加しました。。
原因は不明ですが、移行前に最適化ツール色々実行しちゃったのが何か良くなかった??

↑修正後、2度目以降のアクセスで表示に掛かる時間が0.1秒以下になることを確認しました。
まとめると
| 改善前 | 9340ms |
| OPcache、APCuインストール | 958ms |
| nginx(+ngx_cache_purge)インストール | 927ms |
| WP Sitemanagerプラグイン再設定 | 63ms |
という結果となりました。
PHP8.0インストール
自分の知識が色々と古いことが原因で非常に苦戦しました。
失敗した手順も備忘録のために記載しておきます。
epel、remiリポジトリを追加
CentOS Stream標準のPHPバージョンが7.2なのを確認
# yum list available | grep php
mlt-php.x86_64                     6.24.0-4.el8                                           epel
mlt-php-debuginfo.x86_64           6.24.0-4.el8                                           epel-debuginfo
php.x86_64                         7.2.24-1.module_el8.2.0+313+b04d0a66                   appstream
php-IDNA_Convert.noarch            0.8.0-14.el8                                           epel
php-IDNA_Convert.src               0.8.0-14.el8                                           epel-source
php-adodb.noarch                   5.20.6-9.el8                                           epel
php-adodb.src                      5.20.6-9.el8                                           epel-source
php-bcmath.x86_64                  7.2.24-1.module_el8.2.0+313+b04d0a66                   appstream
php-cli.x86_64                     7.2.24-1.module_el8.2.0+313+b04d0a66                   appstream
php-common.x86_64                  7.2.24-1.module_el8.2.0+313+b04d0a66                   appstream
php-dba.x86_64                     7.2.24-1.module_el8.2.0+313+b04d0a66                   appstream
php-dbg.x86_64                     7.2.24-1.module_el8.2.0+313+b04d0a66                   appstream
php-devel.x86_64                   7.2.24-1.module_el8.2.0+313+b04d0a66                   appstream
~~~省略~~~
epel、remiリポジトリを追加
# yum install epel-release
# yum update epel-release

# ll /etc/yum.repos.d/
total 76
-rw-r--r--. 1 root root  713 Sep 15 10:11 CentOS-Stream-AppStream.repo
-rw-r--r--. 1 root root  698 Sep 15 10:11 CentOS-Stream-BaseOS.repo
-rw-r--r--. 1 root root  316 Sep 15 10:11 CentOS-Stream-Debuginfo.repo
-rw-r--r--. 1 root root  698 Sep 15 10:11 CentOS-Stream-Extras.repo
-rw-r--r--. 1 root root  734 Sep 15 10:11 CentOS-Stream-HighAvailability.repo
-rw-r--r--. 1 root root  696 Sep 15 10:11 CentOS-Stream-Media.repo
-rw-r--r--. 1 root root  718 Sep 15 10:11 CentOS-Stream-PowerTools.repo
-rw-r--r--. 1 root root  690 Sep 15 10:11 CentOS-Stream-RealTime.repo
-rw-r--r--  1 root root  748 Sep 15 10:11 CentOS-Stream-ResilientStorage.repo
-rw-r--r--  1 root root 1568 Sep 15 10:11 CentOS-Stream-Sources.repo
-rw-r--r--  1 root root 1485 Sep  5 02:28 epel-modular.repo
-rw-r--r--  1 root root 1490 Sep  5 02:28 epel-next.repo
-rw-r--r--  1 root root 1592 Sep  5 02:28 epel-next-testing.repo
-rw-r--r--  1 root root 1564 Sep  5 02:28 epel-playground.repo
-rw-r--r--. 1 root root 1417 Sep 16 16:09 epel.repo
-rw-r--r--  1 root root 1422 Sep  5 02:28 epel.repo.rpmnew
-rw-r--r--  1 root root 1584 Sep  5 02:28 epel-testing-modular.repo
-rw-r--r--  1 root root 1521 Sep  5 02:28 epel-testing.repo
-rw-r--r--  1 root root  398 Oct 23 13:59 nginx.repo

# rpm -ivh http://rpms.remirepo.net/enterprise/remi-release-8.rpm
# rpm --import http://rpms.remirepo.net/RPM-GPG-KEY-remi
yum install 〇〇を実行する際、GPGキー云々のエラーが出たので以下のコマンド実行
この作業中、今はパッケージ管理にyumじゃなくてdnfというコマンドを使うことを知りました(^^;
ついでにremiリポジトリのenable設定を有効化
# dnf install https://rpms.remirepo.net/enterprise/remi-release-8.rpm
# yum config-manager --enable remi
# ll /etc/yum.repos.d/
total 88
-rw-r--r--. 1 root root  713 Sep 15 10:11 CentOS-Stream-AppStream.repo
-rw-r--r--. 1 root root  698 Sep 15 10:11 CentOS-Stream-BaseOS.repo
-rw-r--r--. 1 root root  316 Sep 15 10:11 CentOS-Stream-Debuginfo.repo
-rw-r--r--. 1 root root  698 Sep 15 10:11 CentOS-Stream-Extras.repo
-rw-r--r--. 1 root root  734 Sep 15 10:11 CentOS-Stream-HighAvailability.repo
-rw-r--r--. 1 root root  696 Sep 15 10:11 CentOS-Stream-Media.repo
-rw-r--r--. 1 root root  718 Sep 15 10:11 CentOS-Stream-PowerTools.repo
-rw-r--r--. 1 root root  690 Sep 15 10:11 CentOS-Stream-RealTime.repo
-rw-r--r--  1 root root  748 Sep 15 10:11 CentOS-Stream-ResilientStorage.repo
-rw-r--r--  1 root root 1568 Sep 15 10:11 CentOS-Stream-Sources.repo
-rw-r--r--  1 root root 1485 Sep  5 02:28 epel-modular.repo
-rw-r--r--  1 root root 1490 Sep  5 02:28 epel-next.repo
-rw-r--r--  1 root root 1592 Sep  5 02:28 epel-next-testing.repo
-rw-r--r--  1 root root 1564 Sep  5 02:28 epel-playground.repo
-rw-r--r--. 1 root root 1417 Sep 16 16:09 epel.repo
-rw-r--r--  1 root root 1422 Sep  5 02:28 epel.repo.rpmnew
-rw-r--r--  1 root root 1584 Sep  5 02:28 epel-testing-modular.repo
-rw-r--r--  1 root root 1521 Sep  5 02:28 epel-testing.repo
-rw-r--r--  1 root root  398 Oct 23 13:59 nginx.repo
-rw-r--r--  1 root root  935 Jul  5 23:00 remi-modular.repo
-rw-r--r--  1 root root 1448 Jul  5 23:00 remi.repo
-rw-r--r--  1 root root  810 Jul  5 23:00 remi-safe.repo
失敗手順1 PHP8.0以外のPHPパッケージがインストール候補に含まれる
# dnf install --disablerepo=remi-safe php80-php php80-php-cli php80-php-common php80-php-devel php80-php-fpm php80-php-gd php80-php-intl php80-php-mbstring php80-php-mysqlnd php80-php-pdo php80-php-pear php80-php-pecl-mcrypt php80-php-pecl-zip php80-php-xml
↑移行元のサーバーで使用しているPHPに関するパッケージを調べ、PHP8.0用に書き直したインストールコマンド
既存サーバーと同じものっぽいオプションパッケージをフルでコマンドに付け足したところ、CentOS Stream標準のPHP7.2のものと思われるパッケージがいくつかインストール対象に含まれてしまいました。
このコマンドはy/Nの確認でNを入力してキャンセルしました。
失敗手順2 インストール後の状況が不安な状態でインストールされてしまう
# dnf install --disablerepo=remi-safe php80-php php80-php-cli
Dependencies resolved.
===============================================================================================================================================
 Package                                   Architecture        Version                                            Repository              Size
===============================================================================================================================================
Installing:
 php80-php                                 x86_64              8.0.12-1.el8.remi                                  remi                   1.6 M
 php80-php-cli                             x86_64              8.0.12-1.el8.remi                                  remi                   3.2 M
Installing dependencies:
 apr                                       x86_64              1.6.3-12.el8                                       appstream              129 k
 apr-util                                  x86_64              1.6.1-6.el8                                        appstream              105 k
 centos-logos-httpd                        noarch              85.8-1.el8                                         appstream               75 k
 environment-modules                       x86_64              4.5.2-1.el8                                        baseos                 421 k
 httpd                                     x86_64              2.4.37-40.module_el8.5.0+852+0aafc63b              appstream              1.4 M
 httpd-filesystem                          noarch              2.4.37-40.module_el8.5.0+852+0aafc63b              appstream               39 k
 httpd-tools                               x86_64              2.4.37-40.module_el8.5.0+852+0aafc63b              appstream              106 k
 libsodium                                 x86_64              1.0.18-2.el8                                       epel                   162 k
 mod_http2                                 x86_64              1.15.7-3.module_el8.4.0+778+c970deab               appstream              154 k
 oniguruma5php                             x86_64              6.9.7.1-1.el8.remi                                 remi                   210 k
 php80-php-common                          x86_64              8.0.12-1.el8.remi                                  remi                   727 k
 php80-runtime                             x86_64              1.0-3.el8.remi                                     remi                   1.1 M
 policycoreutils-python-utils              noarch              2.9-16.el8                                         baseos                 252 k
 scl-utils                                 x86_64              1:2.0.2-14.el8                                     appstream               47 k
Installing weak dependencies:
 apr-util-bdb                              x86_64              1.6.1-6.el8                                        appstream               25 k
 apr-util-openssl                          x86_64              1.6.1-6.el8                                        appstream               27 k
 php80-php-fpm                             x86_64              8.0.12-1.el8.remi                                  remi                   1.7 M
 php80-php-mbstring                        x86_64              8.0.12-1.el8.remi                                  remi                   492 k
 php80-php-opcache                         x86_64              8.0.12-1.el8.remi                                  remi                   552 k
 php80-php-pdo                             x86_64              8.0.12-1.el8.remi                                  remi                   136 k
 php80-php-sodium                          x86_64              8.0.12-1.el8.remi                                  remi                    90 k
 php80-php-xml                             x86_64              8.0.12-1.el8.remi                                  remi                   184 k

Transaction Summary
===============================================================================================================================================
Install  24 Packages
失敗手順1の内容を踏まえてremiリポジトリからphp80-php php80-php-cliの2つのみを選択してインストール
インストール自体はうまく行きましたが/bin直下にphpコマンドが見当たらなかったり(php80というコマンドは存在する)、
設定ファイルが/etc/opt/remi/php80~~という深いところにある状態となってしまいました。。
調べるとphp80→phpのシンボリックリンクを作成して使っている方の情報が見つかりましたが、なんか違う気がしたので元に戻しました。
成功手順 モジュールとしてインストール
モジュールとしてインストールしようとしたら上の失敗手順の作業の残骸が原因なのか、リセットしてって感じのエラーが出たので以下の手順でインストールしなおし
# dnf remove php*
# dnf module list php
# dnf module reset php
# dnf module install php:remi-8.0
Dependencies resolved.
===============================================================================================================================================
 Package                                                Architecture                                 Version
===============================================================================================================================================
Installing group/module packages:
 php-cli                                                x86_64                                       8.0.12-1.el8.remi
 php-common                                             x86_64                                       8.0.12-1.el8.remi
 php-fpm                                                x86_64                                       8.0.12-1.el8.remi
 php-mbstring                                           x86_64                                       8.0.12-1.el8.remi
 php-xml                                                x86_64                                       8.0.12-1.el8.remi
Installing dependencies:
 httpd-filesystem                                       noarch                                       2.4.37-40.module_el8.5.0+852+0aafc63b
 oniguruma5php                                          x86_64                                       6.9.7.1-1.el8.remi
Installing weak dependencies:
 nginx-filesystem                                       noarch                                       1:1.14.1-9.module_el8.0.0+184+e34fea82
Installing module profiles:
 php/common
Enabling module streams:
 php                                                                                                 remi-8.0
この後、追加インストールするphp関連のパッケージは「php80-」のプレフィックス無しで正しいものをインストールできるみたい。
移行元に存在して、こちらで不足してるっぽいパッケージを追加インストール
# dnf install php-devel php-intl php-mysqlnd php-pdo php-pear php-xml
Package php-xml-8.0.12-1.el8.remi.x86_64 is already installed.
Dependencies resolved.
===============================================================================================================================================
 Package                             Architecture        Version                                               Repository                 Size
===============================================================================================================================================
Installing:
 php-devel                           x86_64              8.0.12-1.el8.remi                                     remi-modular              1.2 M
 php-intl                            x86_64              8.0.12-1.el8.remi                                     remi-modular              239 k
 php-mysqlnd                         x86_64              8.0.12-1.el8.remi                                     remi-modular              262 k
 php-pdo                             x86_64              8.0.12-1.el8.remi                                     remi-modular              156 k
 php-pear                            noarch              1:1.10.13-1.el8.remi                                  remi-modular              366 k
Installing dependencies:
 autoconf                            noarch              2.69-29.el8                                           appstream                 710 k
 automake                            noarch              1.16.1-7.el8                                          appstream                 713 k
 cmake-filesystem                    x86_64              3.20.2-4.el8                                          appstream                  44 k
~~~省略~~~
php.ini書き換え
# cp /etc/php.ini /etc/php.ini.20211023
# vi /etc/php.ini
# diff /etc/php.ini /etc/php.ini.20211023
400c400
< expose_php = Off
---
> expose_php = On
703c703
< post_max_size = 16M
---
> post_max_size = 8M
855c855
< upload_max_filesize = 14M
---
> upload_max_filesize = 2M
932c932
< date.timezone = "Asia/Tokyo"
---
> ;date.timezone =
php-fpmの設定をnginx用に書き換え&自動起動設定&再起動
# cp /etc/php-fpm.d/www.conf /etc/php-fpm.d/www.conf.20211023
# vi /etc/php-fpm.d/www.conf
# diff /etc/php-fpm.d/www.conf /etc/php-fpm.d/www.conf.20211023
24c24
< user = nginx
---
> user = apache
26c26
< group = nginx
---
> group = apache
38c38
< listen = /var/run/php-fpm/php-fpm.sock
---
> listen = /run/php-fpm/www.sock
48,50c48,50
< listen.owner = nginx
< listen.group = nginx
< listen.mode = 0660
---
> ;listen.owner = nobody
> ;listen.group = nobody
> ;listen.mode = 0660
55c55
< ;listen.acl_users = apache,nginx
---
> listen.acl_users = apache,nginx
392d391
< security.limit_extensions = .php .html

# systemctl enable php-fpm
# systemctl restart php-fpm
10/23 17:14 追記
php-gdインストールするの忘れてエラー出てました。
# yum install php-gd
Dependencies resolved.
=====================================================================================================================
 Package                             Architecture       Version                       Repository                Size
=====================================================================================================================
Installing:
 php-gd                              x86_64             8.0.12-1.el8.remi             remi-modular             102 k
Installing dependencies:
 dejavu-fonts-common                 noarch             2.35-7.el8                    baseos                    74 k
 dejavu-sans-fonts                   noarch             2.35-7.el8                    baseos                   1.6 M
 fontconfig                          x86_64             2.13.1-4.el8                  baseos                   274 k
 fontpackages-filesystem             noarch             1.44-22.el8                   baseos                    16 k
 gd                                  x86_64             2.2.5-7.el8                   appstream                144 k
 jbigkit-libs                        x86_64             2.1-14.el8                    appstream                 55 k
 libX11                              x86_64             1.6.8-5.el8                   appstream                611 k
 libX11-common                       noarch             1.6.8-5.el8                   appstream                158 k
 libXau                              x86_64             1.0.9-3.el8                   appstream                 37 k
 libXpm                              x86_64             3.5.12-8.el8                  appstream                 58 k
 libjpeg-turbo                       x86_64             1.5.3-12.el8                  appstream                157 k
 libtiff                             x86_64             4.0.9-20.el8                  appstream                188 k
 libwebp                             x86_64             1.0.0-5.el8                   appstream                272 k
 libxcb                              x86_64             1.13.1-1.el8                  appstream                229 k

Transaction Summary
=====================================================================================================================
Install  15 Packages
10/24 20:00くらい追記
php-zipも忘れてました。
# dnf install php-zip
上記コマンドでphp-pecl-zipがインストールできました。
MySQL8.0インストール
MySQLは標準で現在最新の8.0.26がインストールできるみたいなので、特にリポジトリの追加などは行いませんでした。
PHPと同様にモジュールとしてインストールしてみました。
# dnf module list mysql
CentOS Stream 8 - AppStream
Name                           Stream                           Profiles                                   Summary
mysql                          8.0 [d]                          client, server [d]                         MySQL Module

ヒント: [d]efault, [e]nabled, [x]disabled, [i]nstalled

# dnf module install mysql:8.0
依存関係が解決しました。
===============================================================================================================================================
 パッケージ                              アーキテクチャー    バージョン                                           リポジトリー           サイズ
===============================================================================================================================================
group/moduleパッケージをインストール:
 mysql-server                            x86_64              8.0.26-1.module_el8.4.0+915+de215114                 appstream               25 M
依存関係のインストール:
 mariadb-connector-c-config              noarch              3.1.11-2.el8_3                                       appstream               15 k
 mecab                                   x86_64              0.996-1.module_el8.4.0+589+11e12751.9                appstream              393 k
 mysql                                   x86_64              8.0.26-1.module_el8.4.0+915+de215114                 appstream               12 M
 mysql-common                            x86_64              8.0.26-1.module_el8.4.0+915+de215114                 appstream              134 k
 mysql-errmsg                            x86_64              8.0.26-1.module_el8.4.0+915+de215114                 appstream              598 k
 protobuf-lite                           x86_64              3.5.0-13.el8                                         appstream              149 k
モジュールプロファイルのインストール中:
 mysql/server
モジュールストリームの有効化中:
 mysql                                                       8.0

トランザクションの概要
===============================================================================================================================================
インストール  7 パッケージ
/etc直下にmy.cnfがあり、そこからmy.cnf.d以下のconfファイルをインクルードしていました。
それぞれ以下のように追記しました。
#
# These two groups are read by the client library
# Use it for options that affect all clients, but not the server
#


[client]
+loose-default-character-set=utf8mb4

# This group is not read by mysql client library,
# If you use the same .cnf file for MySQL and MariaDB,
# use it for MariaDB-only client options
[client-mariadb]
#
# MySQL 8.0.4 introduced 'caching_sha2_password' as its default authentication plugin.
# It is faster and provides better security then the previous default authentication plugin.
#
# Until now (09/2018), it does not work with some other software (eg. MariaDB client, MariaDB connectors,  ...)
#
# This configuration file changes MySQL default server configuration, so it behaves the same way as in MySQL 5.7.
#
# To change the behaviour back to the upstream default, comment out the following lines:

[mysqld]
default_authentication_plugin=mysql_native_password
#
# This group are read by MySQL server.
# Use it for options that only the server (but not clients) should see
#
# For advice on how to change settings please see
# http://dev.mysql.com/doc/refman/en/server-configuration-defaults.html

# Settings user and group are ignored when systemd is used.
# If you need to run mysqld under a different user or group,
# customize your systemd unit file for mysqld according to the
# instructions in http://fedoraproject.org/wiki/Systemd

[mysqld]
datadir=/var/lib/mysql
socket=/var/lib/mysql/mysql.sock
log-error=/var/log/mysql/mysqld.log
pid-file=/run/mysqld/mysqld.pid
+
+character-set-server=utf8mb4
+collation-server=utf8mb4_bin
MySQL起動&自動起動設定&システムDBがあることを確認
# mysql --version
mysql Ver 8.0.26 for Linux on x86_64 (Source distribution)

# systemctl enable mysqld
# systemctl start mysqld

# mysql
mysql> show databases;
+--------------------+
| Database           |
+--------------------+
| information_schema |
| mysql              |
| performance_schema |
| sys                |
+--------------------+
4 rows in set (0.00 sec)
移行先に空のデータベースが用意できました。
移行元のデータベースは確認したところユーザーが作成したDBの数だけで274個、mysql.userも20個くらいの設定がありました。。258個はmd5の変換/逆変換を行うサイトで使用しているDBで、アクセスもほとんど無いみたいなので閉鎖することにしました(´・ω:;.:…
MySQL5.7→MySQL8のデータ移行について、mysqlのシステムDB等を含む丸ごとのデータダンプをリストアし、破損したmysqlシステムデータベースをアップグレードで修正する(mysqld -u root –upgrade=FORCE)という方法があるみたいですが、今回は色々試した結果として以下のような手順となりました。
移行元作業
- 移行元のmysql.userを元に、show create userとshow grants forのクエリ一覧を出力&発行し、mysqlシステムDBの移行用クエリを組み立て
# mysql -s -N > select concat('show create user ', User, '@', Host, ';') as query from mysql.user where Host = 'localhost' and User <> '' and User <> 'root' and User NOT LIKE 'mysql.%'; show create user hogehoge@localhost; show create user fugafuga@localhost; ~~~省略~~~ ↑で取得した結果を丸ごとコピー&実行してCREATE USER文を作成 > show create user hogehoge@localhost; CREATE USER 'hogehoge'@'localhost' IDENTIFIED WITH 'mysql_native_password' AS 'hogehogepass' REQUIRE NONE PASSWORD EXPIRE DEFAULT ACCOUNT UNLOCK > select concat('show grants for ', User, '@', Host, ';') as query from mysql.user where Host = 'localhost' and User <> '' and User <> 'root' and User NOT LIKE 'mysql.%'; show grants for hogehoge@localhost; show grants for fugafuga@localhost; ~~~省略~~~ ↑で取得した結果を丸ごとコピー&実行してGRANT文を作成 > show grants for hogehoge@localhost; GRANT USAGE ON *.* TO 'hogehoge'@'localhost' GRANT SELECT, INSERT, UPDATE, DELETE, CREATE, DROP, INDEX, ALTER ON `hogehoge`.* TO 'hogehoge'@'localhost' - システムDB以外のDBをまとめたダンプを取得
# mysqldump --databases db1 db2 db3... | gzip > mysql57_all_db.dump.gz
移行先作業
- まずDBダンプをリストア
# gunzip mysql57_all_db.dump.gz
# mysql < mysql57_all_db.dump
- MySQLユーザー作成、ユーザーごとの権限作成
# mysql

> CREATE USER 'hogehoge'@'localhost' IDENTIFIED WITH 'mysql_native_password' AS '*hogehogepassword' REQUIRE NONE PASSWORD EXPIRE DEFAULT ACCOUNT UNLOCK;
> CREATE USER 'fugafuga'@'localhost' IDENTIFIED WITH 'mysql_native_password' AS '*fugafugapassword' REQUIRE NONE PASSWORD EXPIRE DEFAULT ACCOUNT UNLOCK;
~~~省略~~~

> GRANT USAGE ON *.* TO 'hogehoge'@'localhost';
> GRANT SELECT, INSERT, UPDATE, DELETE, CREATE, DROP, INDEX, ALTER ON `hogehogedb`.* TO 'hogehoge'@'localhost';
~~~省略~~~

> FLUSH PRIVILEGES;
- まずDBダンプをリストア
この手順で問題なく移行ができました。
MySQLのシステムDBごとリストアする手順もこの移行手順の前に試したりしてたのですが、どうもアップグレードがフリーズしてしまうため上記のような手順を作成しての移行となりました。
移行後のMySQL8.0確認。
移行元と同じ値が確認できました。
# systemctl start mysqld
# mysql
> show databases;
mysql> show databases;
+--------------------+
| Database           |
+--------------------+
| hogehogedb         |
~~~省略~~~
+--------------------+

> select Host, User, authentication_string from mysql.user;
+-----------+-------------+-------------------------------------------+
| Host      | User        | authentication_string                     |
+-----------+-------------+-------------------------------------------+
| localhost | hogehoge    | *hogehogepassword                         |
+-----------+-------------+-------------------------------------------+
rbenv、ruby、bundlerインストール
Qiitaの記事や移行元の環境を見ながら実行
# git clone git://github.com/sstephenson/rbenv.git rbenv
# git clone git://github.com/sstephenson/ruby-build.git rbenv/plugins/ruby-build
# vi /etc/profile.d/rbenv.sh
export RBENV_ROOT="/usr/local/rbenv"
export PATH="${RBENV_ROOT}/bin:${PATH}"
eval "$(rbenv init --no-rehash -)"
# source /etc/profile.d/rbenv.sh # rbenv --version rbenv 1.2.0-1-g6cc7bff # dnf install bzip2 gcc openssl-devel readline-devel zlib-devel # rbenv install 2.6.0 # rbenv versions 2.6.0 # rbenv global 2.6.0 # rbenv versions * 2.6.0 (set by /usr/local/rbenv/version) # ruby -v ruby 2.6.0p0 (2018-12-25 revision 66547) [x86_64-linux] # rbenv exec gem install bundler # bundle --version Bundler version 2.2.29
nvm、Node.js、npmインストール
Qiitaの記事や移行元の環境を見ながら実行
# curl -o- https://raw.githubusercontent.com/nvm-sh/nvm/v0.39.0/install.sh | bash
# source ~/.bash_profile
# nvm install 10.16.0
# node -v
v10.16.0
# which node
/root/.nvm/versions/node/v10.16.0/bin/node
# npm -v
6.9.0
# which npm
/root/.nvm/versions/node/v10.16.0/bin/npm
10/24 18:00くらい 追記 npm installでコケる
インストールは特にエラーなく進んだものの後ほどのnpmを使用した環境構築で、git+https://のURLを含むpackage.jsonがうまく解釈できないという現象に遭遇しました。
移行元の環境と見比べてみると、/root/.npm直下の_cacacheディレクトリと_locksディレクトリの所有者が異なっていた(初期環境構築の際、useraddで追加した一般ユーザーになってた)ため以下のコマンドで修正しました。
# cd /root/.npm/
# chown -R root: _cacache/
# chown -R root: _locks/
certbotインストール
ここはsnapdというパッケージ管理システムを使用するのが現在のよさげなやり方のようで、参考にしたブログの手順にそのまま従ってみました。
# dnf install snapd
# systemctl enable --now snapd.socket
# ln -s /var/lib/snapd/snap /snap
# snap refresh core
# snap install --classic certbot
# ln -s /snap/bin/certbot /usr/bin/certbot

# systemctl stop nginx
# certbot certonly -n --standalone --agree-tos -d etc.imo-tikuwa.com -d onestop.imo-tikuwa.com -m [emailアドレス] --server https://acme-v02.api.letsencrypt.org/directory
# systemctl start nginx

# ll /etc/letsencrypt/live/etc.imo-tikuwa.com
合計 4
-rw-r--r-- 1 root root 692 10月 23 20:05 README
lrwxrwxrwx 1 root root 42 10月 23 20:05 cert.pem -> ../../archive/etc.imo-tikuwa.com/cert1.pem
lrwxrwxrwx 1 root root 43 10月 23 20:05 chain.pem -> ../../archive/etc.imo-tikuwa.com/chain1.pem
lrwxrwxrwx 1 root root 47 10月 23 20:05 fullchain.pem -> ../../archive/etc.imo-tikuwa.com/fullchain1.pem
lrwxrwxrwx 1 root root 45 10月 23 20:05 privkey.pem -> ../../archive/etc.imo-tikuwa.com/privkey1.pem
昔苦労して導入した記憶のあるLet’s Encryptがエラーなしの1発で通った(;・`Д・´)
発行された証明書は以前と同じ/etc/letsencrypt以下に置かれていたので、移行元のnginxのconfファイル内の設定をほぼコピーで行けました。
ひとまずetcとonestopサブドメインのみDNSレコード設定を変更し移行しました。WordPress(このブログ)やそのほかのサブドメインも順次移行していこうと思います。
最終的にはサブドメインなしのドメインをコモンネームにしたワイルドカード証明書を発行できると良いのかなと思います。
10/24 20:30 追記 ワイルドカード証明書を発行する
etc、onestop以外のすべてのサブドメインの移行準備が整ったので今度はワイルドカード証明書を作成してみました。
# certbot certonly --manual --preferred-challenges dns-01 --agree-tos -d imo-tikuwa.com -d *.imo-tikuwa.com -m [emailアドレス] --server https://acme-v02.api.letsencrypt.org/directory
途中で2回、証明書発行対象のドメインにTXTレコードを追加するよう促されました。
指示に従い2回共、DNSレコード設定でTXTレコードを追加→nslookupで確認が取れるくらいの待機→certbotの対話シェルでエンターという操作を行ったら最後にいつもの発行完了のメッセージが出ました。
# certbot revoke --cert-path /etc/letsencrypt/archive/etc.imo-tikuwa.com/cert1.pem
↑のワイルドカード証明書がちゃんと使用できることを確認した後でetc.imo-tikuwa.comをCNAMEとして発行した証明書を失効しておきました。
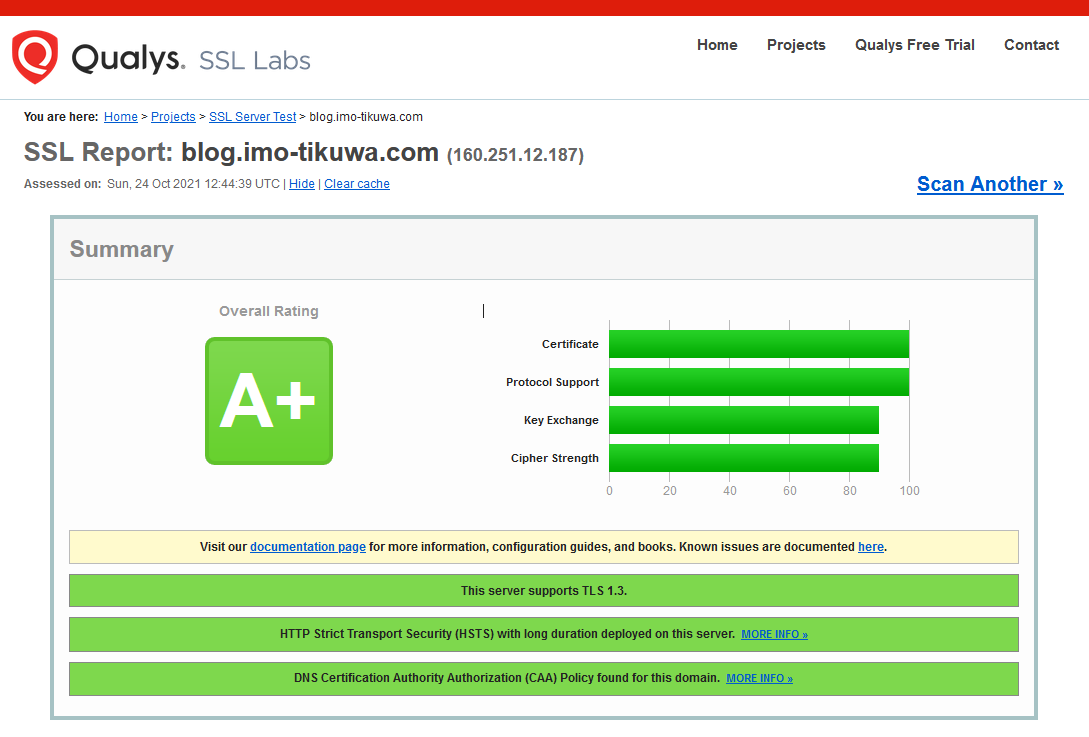
発行後の証明書のステータスについてSSL Labsでテストしてみました。
A+の評価がもらえました。
Python3関連のインストール
移行元で動かしてたpython3製のツールを移行先で動かすまでに至ったトラブルシューティングメモ
CentOS StreamではPython3がデフォルトでインストールされているようで、バージョンも移行元のものと近かったため特に別途インストールするといったことはしませんでした。
# ll /bin/ | grep python
lrwxrwxrwx. 1 root root          25  9月 16 15:59 python3 -> /etc/alternatives/python3
lrwxrwxrwx  1 root root          32 10月 24 18:42 python3-config -> /etc/alternatives/python3-config
lrwxrwxrwx. 1 root root          31  8月 26 00:47 python3.6 -> /usr/libexec/platform-python3.6
lrwxrwxrwx  1 root root          17  8月 26 00:47 python3.6-config -> python3.6m-config
lrwxrwxrwx. 1 root root          32  8月 26 00:47 python3.6m -> /usr/libexec/platform-python3.6m
lrwxrwxrwx  1 root root          39  8月 26 00:47 python3.6m-config -> /usr/libexec/platform-python3.6m-config
lrwxrwxrwx  1 root root          46  8月 26 00:47 python3.6m-x86_64-config -> /usr/libexec/platform-python3.6m-x86_64-config
lrwxrwxrwx. 1 root root          24  1月  7  2021 unversioned-python -> /etc/alternatives/python

# python3 --version
Python 3.6.8
venv環境下のpipでuwsgiをインストールしようとしたときのエラーの対処
# venv/bin/pip install uwsgi
    コンパイルを停止しました。
    In file included from plugins/python/pyutils.c:1:
    plugins/python/uwsgi_python.h:2:10: 致命的エラー: Python.h: そのようなファイルやディレクトリはありません

# dnf install gcc python3-devel
tkinterがないってエラーの対処
# dnf search tkinter
================================================= 名前 一致: tkinter ==================================================
python2-tkinter.x86_64 : A graphical user interface for the Python 2 scripting language
python3-tkinter.i686 : A GUI toolkit for Python
python3-tkinter.x86_64 : A GUI toolkit for Python
python38-tkinter.x86_64 : A GUI toolkit for Python
python39-tkinter.x86_64 : A GUI toolkit for Python
# dnf install python3-tkinter
ffmpegがないってエラーの対処
# dnf localinstall --nogpgcheck https://download1.rpmfusion.org/free/el/rpmfusion-free-release-8.noarch.rpm
# dnf install http://rpmfind.net/linux/epel/7/x86_64/Packages/s/SDL2-2.0.14-2.el7.x86_64.rpm
# dnf install ffmpeg ffmpeg-devel ffmpeg-libs
10/24 22:00くらい追記 子ブログ全体がエラー落ちしてる
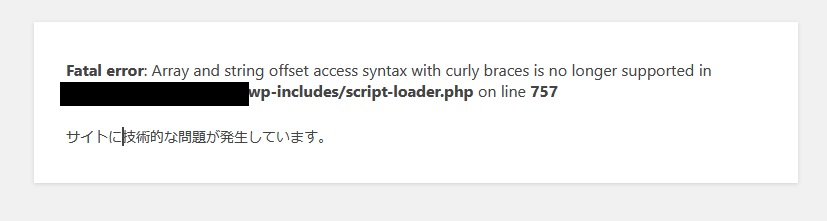
Fatal error: Array and string offset access syntax with curly braces is no longer supported
調べてみたところPHP7の頃は非推奨で許されてた内容がPHP8になってエラーとして扱われるようになったことが原因の模様。
エラーが出てる箇所がWordPressのコアな部分っぽく、アップデートサボってるのが原因っぽい。
既にblogサブドメインは新しいサーバーに移行しており、hostsを書き換えて更新するのも何か外との通信で問題起きそう。。
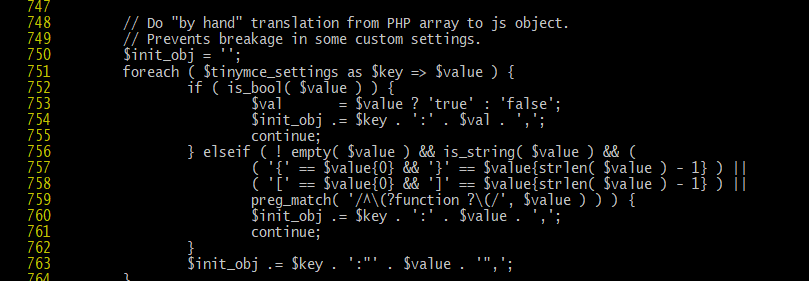
↑エラーが起きてる箇所
移行元にwp cliをインストールしてコマンドからアップデートする
移行元でアップデート作業を実施→ソースを丸ごとtar.gz化→移行先に展開、という手順
# curl -O https://raw.githubusercontent.com/wp-cli/builds/gh-pages/phar/wp-cli.phar
# chmod +x wp-cli.phar
# mv wp-cli.phar /usr/local/bin/wp

# cd [当ブログ]
# wp core version --allow-root
5.8.1

# cd [子ブログ]
# wp core version --allow-root
5.2.12

# wp core update --allow-root
Success: WordPress updated successfully.

# wp core language update --allow-root
Success: Translations are up to date.

# wp plugin update --all --allow-root
Success: Updated 11 of 11 plugins.
~~~省略~~~

# wp theme update --all --allow-root
Success: Updated 1 of 1 themes.
+----------------+-------------+-------------+---------+
| name           | old_version | new_version | status  |
+----------------+-------------+-------------+---------+
| twentynineteen | 1.4         | 2.1         | Updated |
+----------------+-------------+-------------+---------+
アップデート前に当ブログと子ブログのバージョンを確認したところ、やはり子ブログの方はだいぶ古いバージョンのようでした。。
ともあれwp-cliからのアップデートで子ブログも見れるようになりました。
移行済のページ情報一覧
- https://etc.imo-tikuwa.com/
- サブドメインを切るまでは無いようなスクリプトとか勉強用のコード置いとくページ
そのうち整理する
- サブドメインを切るまでは無いようなスクリプトとか勉強用のコード置いとくページ
- https://onestop.imo-tikuwa.com/
- ふるさと納税で使うワンストップ特例申請書を入力した情報を元に出力するruby(Sinatra)製ツール
ここで出力したものを申請した実績がない
- ふるさと納税で使うワンストップ特例申請書を入力した情報を元に出力するruby(Sinatra)製ツール
- https://milligasha.imo-tikuwa.com/
- CakePHP4を使って開発したミリシタのガシャシミュレータ
- https://demo01.imo-tikuwa.com/
- 100%を自作のbakeプラグインで生成したCMS
今回サーバーを移行する原因となったシステム
- 100%を自作のbakeプラグインで生成したCMS
- https://blog.imo-tikuwa.com/
- 当ブログ
- https://blog.imo-tikuwa.com/ssl-2016/
- 2016年頃に作ったSSL証明書を含む一連の環境構築をまとめた子ブログ
情報古いしなんか恥ずかしいのでそのうち消す
- 2016年頃に作ったSSL証明書を含む一連の環境構築をまとめた子ブログ
参考サイト
CentOS8設定の基礎 – dnfについて その3 モジュールについて – ユウてき
CentOS 8 : 日本語環境にする : Server World
CentOS Stream@ConoHa VPS その5 Let’s Encrypt | 代表のブログ
CentOSにrbenv, Rubyをインストールする – Qiita
CentOSでrbenvをシステムにインストールする – Qiita
Let’s Encrypt でワイルドカードを使う – ラボラジアン
CentOS8にffmpegインストール; パッケージには気を付けよう | ゆうぼうの書跡棚
NGINX systemd service file | NGINX
APCu , OPcacheの導入 PHP サーバ高速化│システムガーディアン株式会社